Chocolate Almond Butter Banana Protein Cookies (Vegan + GF)

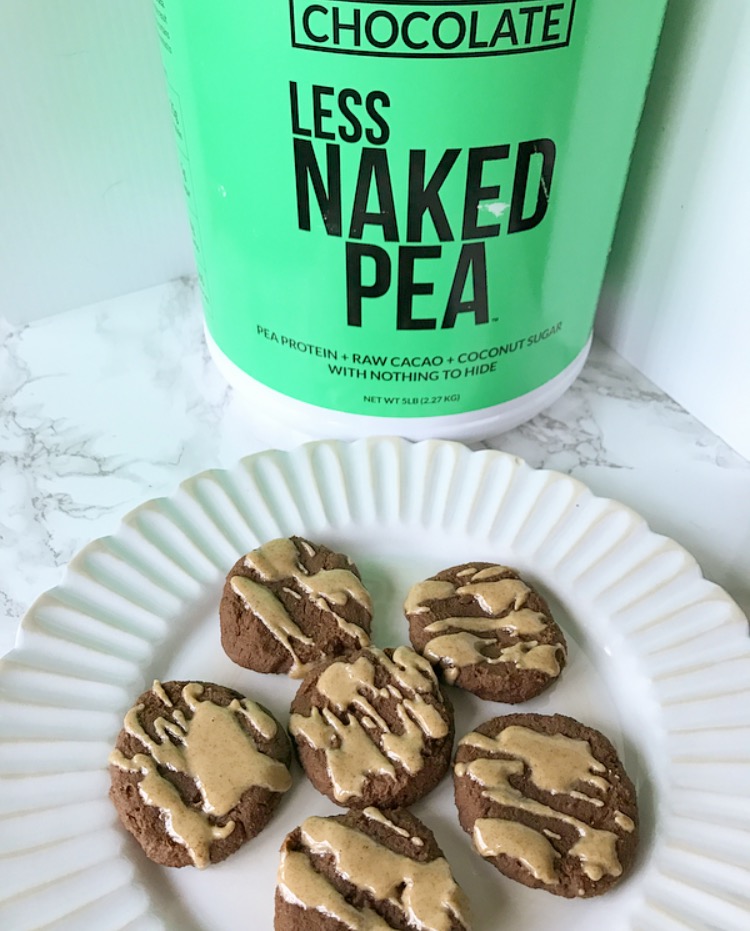
Chocolate almond butter banana protein cookies - what a freakin mouthful, am I right? But each ingredient is so important and adds such an extra punch of flavor to this recipe that I couldn't leave one out. So chocolate almond butter banana protein cookies it is!

They're vegan. They're gluten free. They take only 8 (YES 8) minutes to bake. They're delicious. AND you can even eat the batter because did I mention they're vegan and delicious? Plus you get some great protein thanks to Naked Nutrition's Chocolate Less Naked Pea Protein Powder and almond butter. So let's not waste anymore time and get this thing started!

Here's What You'll Need:

-2 scoops Naked Nutrition's Chocolate Less Naked Pea Protein Powder
-1 tbsp cacao powder (I use this one)
-2 tbsp coconut flour
-1 banana
-1/2 tsp baking powder
-1/2 tsp vanilla
-2 tbsp unsweetened almond milk
-2 tbsp unsweetened almond butter (I use this one)
-1 tbsp maple syrup
-2 tbsp sweet almond coconut butter (optional; I use this one)

Makes about 8 cookies

Instructions:

1) Preheat your oven to 350 degrees.
2) Mash the banana in a bowl until relatively smooth.
3) Add in all of the other ingredients minus the almond coconut butter and mix thoroughly until it forms a dough-like consistency.
4) Form the dough into balls about an inch in diameter and place on a baking sheet lined with parchment paper.
5) Flatten the balls slightly using your hand or the back of a spoon to form a cookie shape.
6) Bake in the oven for about 8 minutes, and then remove to cool.
7) (Optional) Warm up the almond coconut butter until it becomes semi-liquid and drizzle-able. Drizzle some on top of each cookie.
8) Allow the cookies to cool (and the almond coconut butter to harden).
9) Serve, and enjoy!

If you just can't wait, I do have to say that they're also great warm! Either way, they're a great pre or post-workout treat or just a great protein-packed snack or dessert. Also make sure to check out Naked Nutrition's other vegan protein products, and let me know what you think of the recipe in the comments below!

Blueberry Pie Stovetop Oats

Does it get much better than warm pie straight out of the oven with fresh fruit inside and a nice crumble on top? I didn't think so. So when breakfasting (is that a word? Definitely making it one) earlier this week, something in me was just craving the satisfaction that comes only after fresh baked pie. So I figured why not try to bring all of that goodness to my morning oatmeal? 

I also saw that I had some blueberry Lifeway kefir on hand, and I thought that would not only add the perfect flavor but really bring a delicious, rich consistency to the oats. And trust me, it does. I warmed up a nice, quick, and easy crumble to add on top, plus some extra blueberries, and a cashew butter drizzle, and we were good to go! It was so comforting and satisfying and the perfect way to get that pie fix early in the morning.

Here's What You'll Need:

For the Oats:
-1.5 cups rolled oats
-8 oz blueberry Lifeway kefir
-1.5 cups water
-1/2 cup frozen blueberries (fresh also works)
-2 tbsp maple syrup
-1/2 tsp vanilla
-1/2 tsp cinnamon
-Pinch of sea salt

For the Crumble:
-1/4 cup rolled oats
-1 tbsp almond flour (I use this one)
-3 tbsp coconut butter (I use this one)
-1 tsp coconut sugar
-Pinch of sea salt

Serves 3

Instructions:

1) Mix together the 1.5 cups rolled oats, water, and kefir in a saucepan, and bring to a boil over medium high heat.
2) Once boiling, reduce the heat to low, and add in the remaining oats ingredients.
3) Continue to cook the oats, stirring regularly, until they thicken to your desired consistency (about 5-8 minutes).
4) Remove them from the heat and split between bowls.
5) In the meantime, heat up the remaining 1/4 cup oats in a pain over medium heat to toast them just a bit (2-3 minutes).
6) Add in the coconut butter and cook the two until the coconut butter is fully melted.
7) Add in the remaining crumble ingredients, stirring to combine well. Remove from heat.
8) Split the crumble to top each bowl.
6) Add any extra desired toppings, serve, and enjoy!

As I mentioned earlier, I topped mine with a extra frozen blueberries and cashew butter which I'd highly recommend, but feel free to play around! Let me know what you think in the comments below.

Cauliflower Nachos

Cauliflower has easily become one of my favorite veggies. It's delicious on its own or roasted, and it can literally be made into or the vehicle for basically anything - pizza crust, rice, buffalo "wings", you name it! It just has a naturally great flavor without being overwhelming. 

So earlier this week when I was craving nachos, I figured why not?! Sweet potato nachos are delicious, so why not swap out the chips (or sweet potatoes) for cauliflower this time. I just sliced the cauliflower into thin, chip-like pieces, seasoned them a bit, and they were the perfect base for some delicious nachos.

Here's What You'll Need:

-1 head of cauliflower, sliced into 1/4-1/2" strips (they will naturally break into "chips", and you can cut them into smaller pieces if desired)
-2 tbsp avocado oil
-1/4 tsp sea salt
-1/4 tsp black pepper
-1 tsp Just Spices Flavors of Mexico Seasoning (the code juststacy15 will get you 15% off)
-1/2 cup black beans
-1/2 large tomato, cubed
-1/4 cup red onion, chopped
-1/2 avocado, cubed
-1 jalapeno, chopped (optional)
-1/4 cup salsa
-1/2 cup shredded Mexican cheese blend

Instructions:

1) Toss the cauliflower pieces with the avocado oil, sea salt, black pepper, and Flavors of Mexico spice blend, and spread the cauliflower evenly over a baking sheet lined with parchment paper.
2) Cook in a preheated oven at 450 degree for 15-20 minutes until tender.
3) Remove from the oven, and evenly spread all of the other ingredients over the cauliflower.
4) Return the cauliflower to the oven at the same heat for an additional 5 minutes until the cheese melts.
5) Remove, serve, and enjoy!

Easy peasy, right?! And it's oh so delicious! You won't be missing those chips, trust me! I'd love to hear what you think in the comments below.

One-Pan Healthier Eggplant Parmesan

Would you believe that I've never made eggplant Parmesan? It's literally one of my favorite meals, and probably my go-to splurge meal at an Italian restaurant. So yesterday I decided that today was the day.

I had randomly bought an eggplant at Whole Foods with literally no idea or intentions for what I was going to do with it. I thought about roasting it, eggplant fries, and then it hit me (and by hit me, I mean I saw eggplant parm on Instagram). The delicious, crispy crust and ooey gooey cheesy goodness of eggplant parm was calling my name. I literally thought about it all day. Nearly 12 hours dreaming about this dish that I had never made and that could ultimately be a real F-ing disaster. But I had to give it a whirl. 

I don't know how, I guess the food gods were on my side with this one, but it was seriously BOMB. Part of me just cringed at using that word, but there's no other way to describe it. It was crispy, it was cheesy, you can still taste the eggplant, AND it's wayyyyyy better for you than the restaurant version. So let's get right on into it.

Here's What You'll Need:

-1 eggplant, sliced into 1/4-1/2" slices depending on preference (I went with about 1/2", making 10 slices)
-1/2 cup almond flour (I used this one)
-1 cup panko bread crumbs
-3 tbsp shredded parm, separated
-2 eggs, whisked
-2 tbsp olive oil, separated (into 1/2 tbsp increments)
-12 oz marinara sauce or more if desired
-1/2 cup shredded mozzarella (I used this one)
-Sea salt and black pepper

Serves 3-4

Directions:

1) Season both sides of each piece of eggplant with sea salt and black pepper.
2) Set up your dipping station (near your stove) - (a semi-large, shallow bowl of each) almond flour, 2 whisked eggs, and the panko bread crumbs mixed with 2 tbsp parmesan.
3) In a large oven-friendly pan, heat up 1/2 tbsp olive oil over medium high heat. 
4) Dip one eggplant slice at a time into the almond flour followed by the eggs followed by the bread crumb Parmesan mixture, coating all sides and edges), and place the eggplant directly into the heated pan.
5) Repeat until the pan is full, cover, and cook for about 3-5 minutes until one side is browned. Flip and cook for an additional 3-5 minutes.
6) Remove the eggplant pieces onto a cutting board or plate. Add in another 1/2 tbsp olive oil, and repeat until all of the eggplant slices are coated and cooked. This took me about 4 rotations (hence the 2 tbsp of olive oil).
7) Remove the pan from the heat, and pour in enough marinara to cover the bottom.
8) Add in a layer of the coated and cooked eggplant, topping each with a small spoonful of marinara, a sprinkle of mozzarella, and a sprinkle of the remaining parm.
9) Add in another layer of eggplant and repeat.
10) Add any remaining sauce or cheese over the top of the eggplant pieces.
11) Put the entire pan into the oven on broil for about 5-8 minutes until the cheese is melted and starts to turn a slight golden brown.
12) Remove the pan, serve, and enjoy!

IMG_3358.JPG

I served mine over some cooked garlic zucchini noodles, and it was the perfect pair. Let me know what you think in the comments below! I'd love to hear from you.

Spiralized Apple and Brussels Sprouts Frittata

So I'm just going to get right to it - I know the combo sounds a bit odd. apples and Brussels sprouts? But I'm telling you it is just SO good! It's one of those you need to trust me until you try it, because it's life changing. I've been making this combo for a little while now, whether is a frittata, omelet, or scramble. But regardless, it's seriously F-ing delicious. I don't want to waste any more time - let's just get to the goods.

Here's What You'll Need:

-5 eggs, whisked
-15-20 Brussels sprouts, bottoms removed and either halved or quartered depending on size
-1 granny smith apple, spiralized (can be chopped or shredded as well)
-1/4 cup red onion, sliced
-2 tbsp shredded parmesan cheese
-1 tbsp ghee (or non-stick spray or coconut oil)
-Sea salt, black pepper, and any additional seasoning to taste (I LOVE this one, and you can used the code juststacy15 for 15% off)

Serves 2

Instructions:

1) In an oven-friendly pan, melt the ghee over medium high heat on the stove top. 
2) Once melted, spread the ghee all over the bottom and sides of the pan, and add in the Brussels sprouts and cook alone and covered for about 5 minutes.
3) Add in the red onion and continue to cook, stirring occasionally, until the Brussels sprouts really start to soften and brown a bit (about another 5 minutes).
4) Add in the spiralized apple and cook for 2-3 minutes until the apple just starts to soften a bit.
5) Spread out the veggies and apple mixture evenly in the pan, and sprinkle the parm over everything.
6) Mix your seasonings into your eggs, and pour the egg mixture evenly over your apple, veggie, and cheese mixture.
7) Cover the pan and cook for about 3-5 minutes until the sides look cooked and start to come away from the pan a bit.
8) Once this occurs, remove the lid, and pop the entire pan into the oven on broil, cooking for about 5-8 minutes until the frittata is cooked through and a light golden brown on the top.
9) Remove the pan from the oven, flip or remove the frittata with a spatula onto a cutting board. Slice it in half, serve, and enjoy!

So what'd ya think? Has your mind been blown by this delicious, sweet, and savory combo? Let me know in the comments below!